

Lightroom can be a confusing program for some. Here’s a tutorial to help you with exporting in Adobe Lightroom.
What’s The Deal With Exporting in Adobe Lightroom?
So, here’s the skinny. When you export a photo from your Lightroom catalog you’re given a a window with a bunch of settings that may seem confusing to the uninitiated. In this post, I’m going to break them down and show you what you need to know to have a properly exported file.
Where Do We Start?

Well, we’re going to start this tutorial the way every tutorial should start, with nature’s greatest vegetable, bacon. Here, I have some photos for a tutorial I did on How To Make Perfectly Cooked Bacon In The Oven. MMM Bacon. As you can see, I’ve already rated, edited. and retouched the images and they’re ready to be put out into the world. The next thing you’re going to do is export the photos.
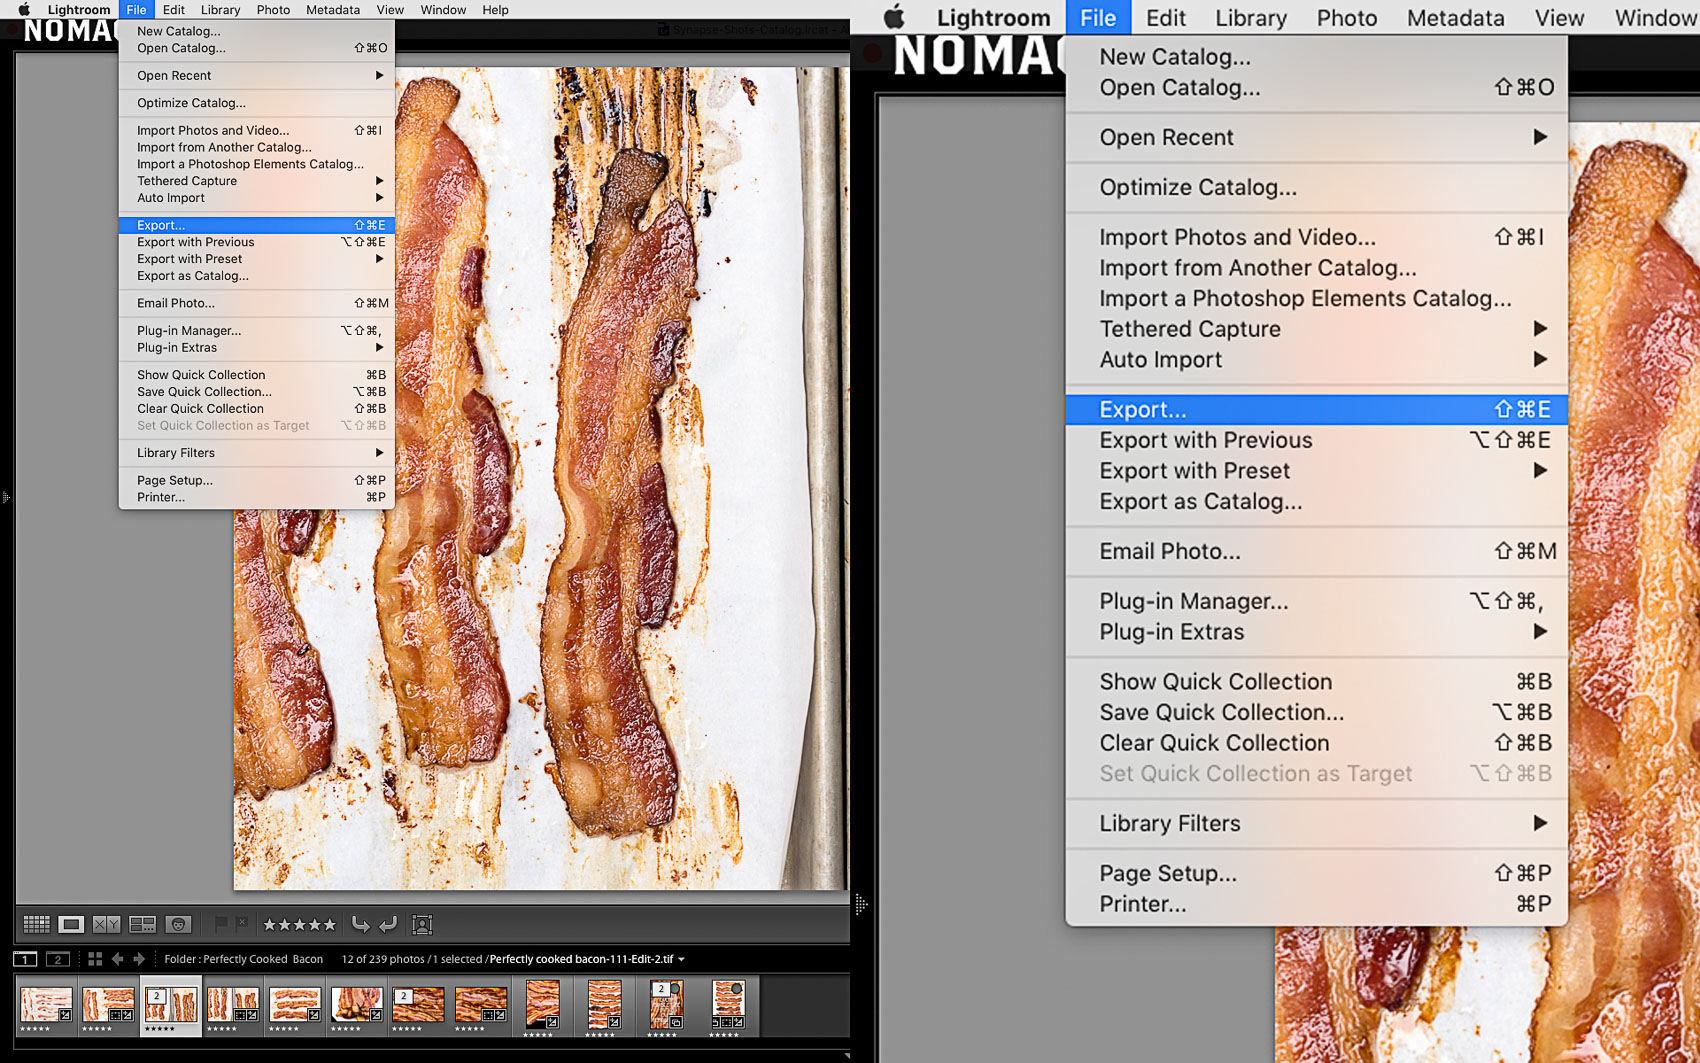
To export your photos go to File>Export in the Lightroom Menu (Mac shortcut cmd + shift + e).
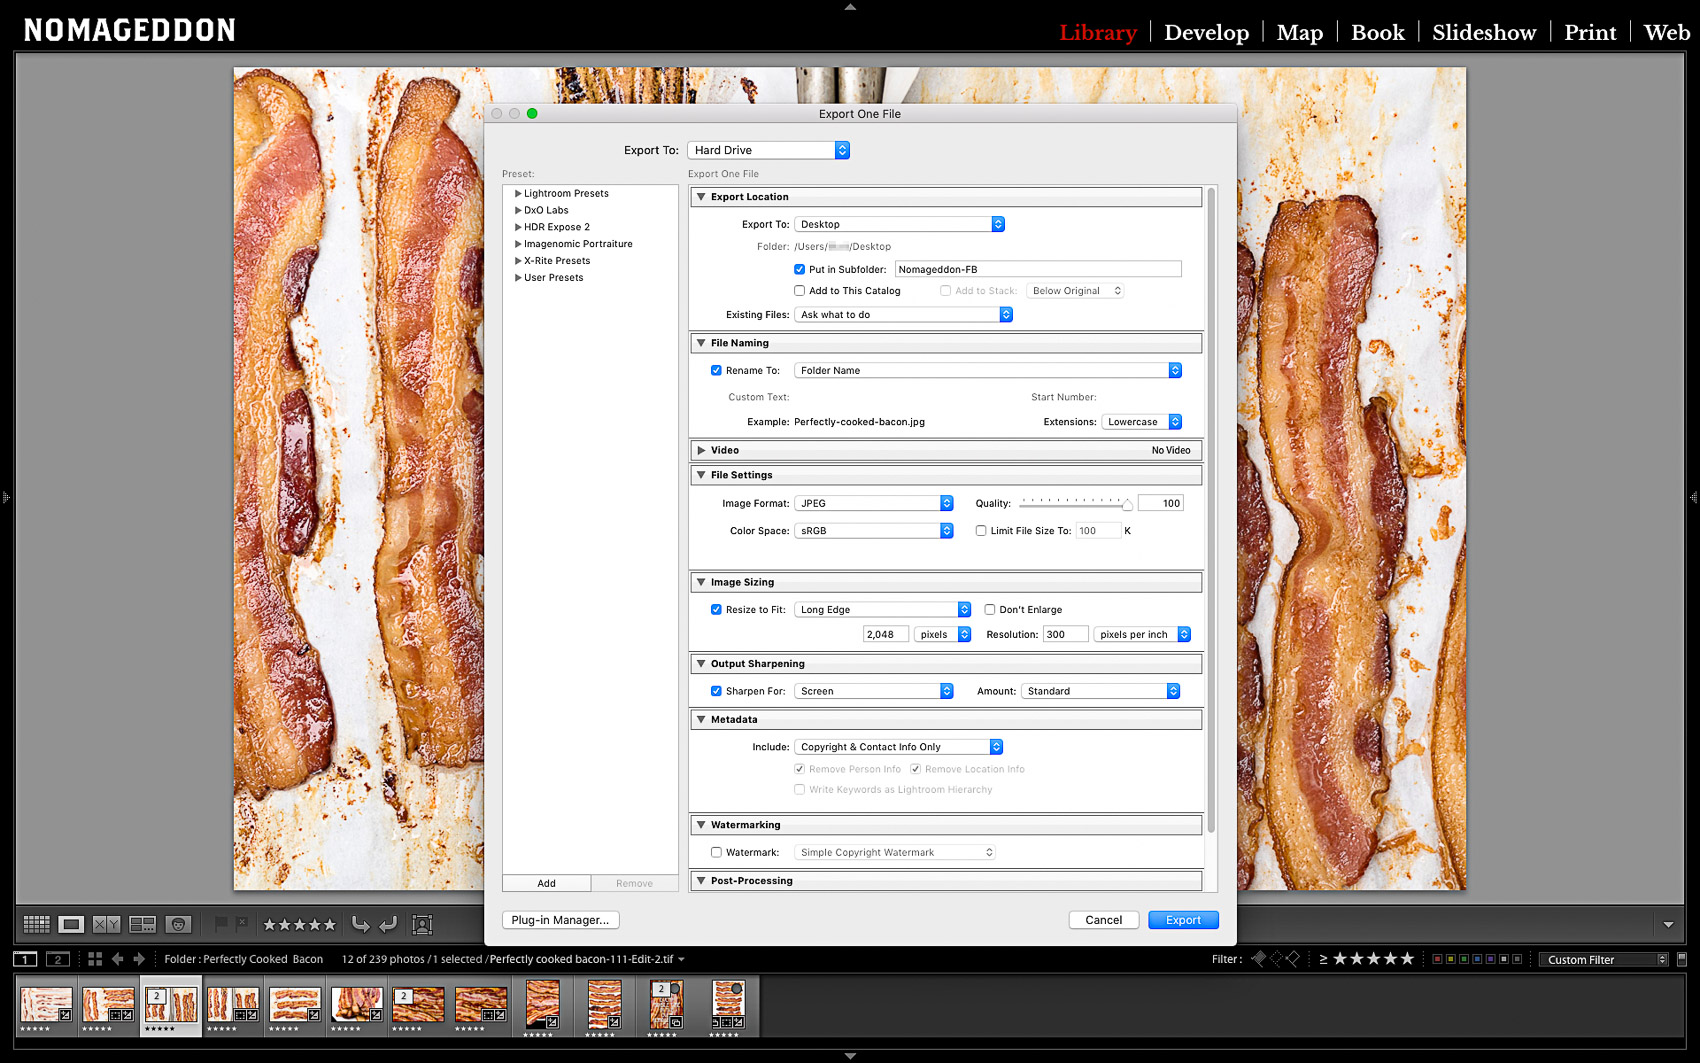
This will bring up the Export Dialogue.

Whoa! What Does All That Stuff Mean?
Well, I’m going to break it down section by section. I have this particular export preset set up to create a photo that will eventually be uploaded to Facebook. All the settings are what the FB compression algorithm is looking for and uploading at these settings will prevent any strange pixelation or posterization from Facebook.
Export To

The first option is Export To. More often than not, you will be exporting your files to a hard drive. In some cases, however, you might need to burn a disc or email the files to a client.
Export Location
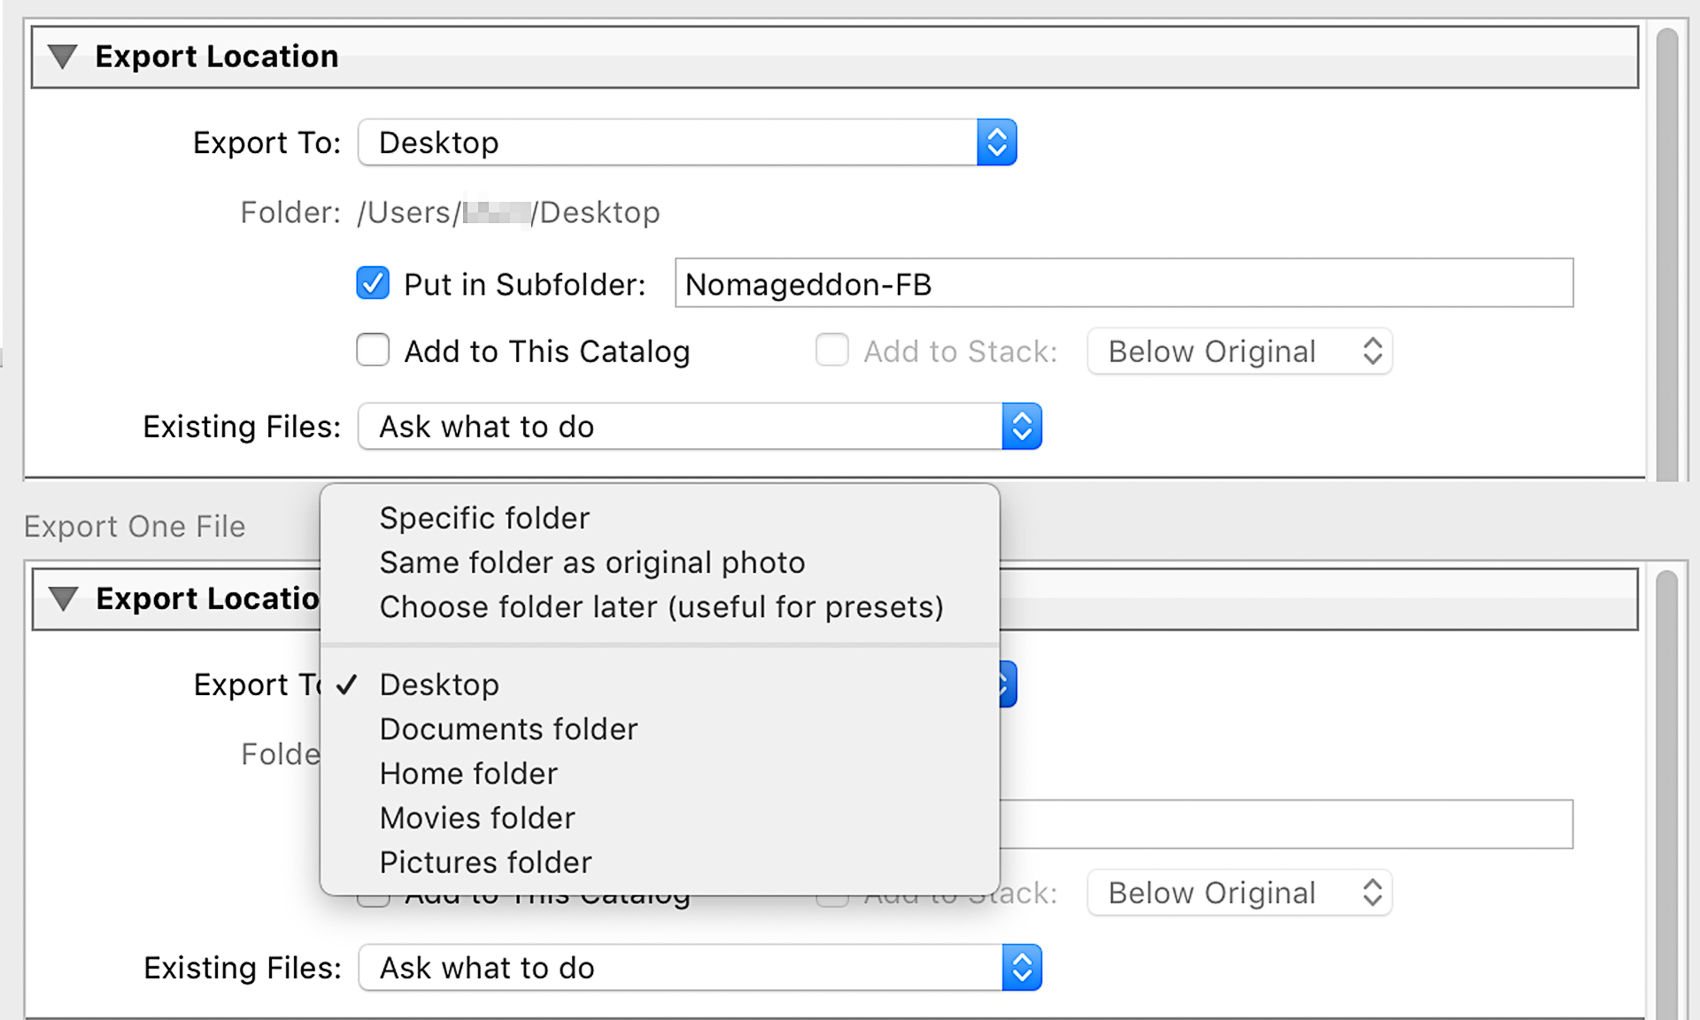
Next is Export Location. This is where you set up where your photo that you’re exporting is actually going. You can have it set to a specific folder on your hard drive, the same folder as the original, or set it so that you can choose a folder later. There are also a set of default folders and in this case, since one of them is the Desktop, we’ll be using that for this tutorial since these photos are kind of disposable, they are only going to Facebook after all,
You can also set it to create a subfolder within the folder, in this case the Desktop, and it’s a good idea to give it a clear name that will make sense to you later. Every so often I delete my Facebook export folder to clear up space and Lightroom will just create a new one for me.
In this case we are not going to add it to the catalog, but you could do that as an option. Your exported photo will simply be added to the catalog.
The last drop down will give you the choice of what you want Lightroom to do if there is a file in that folder with same same filename. You can either have it:
[list][list_item icon=”fa-gear”]Choose A Name: Lightroom will choose a unique name for the file. This basically means that it will take on a number in sequence.[/list_item][list_item icon=”fa-gear”]Overwrite Without Warning: Lightroom will overwrite the file if the it has the same name without asking you.[/list_item][list_item icon=”fa-gear”]Skip: Lightroom will just skip writing the file if there is already one there with that filename.[/list_item][/list]
I like to have it ask what to do because there is a huge chance I will do something without paying attention and fuck something up and overwrite a file I needed. It’s just to protect against my absent mind. What were we talking about again?
File Naming
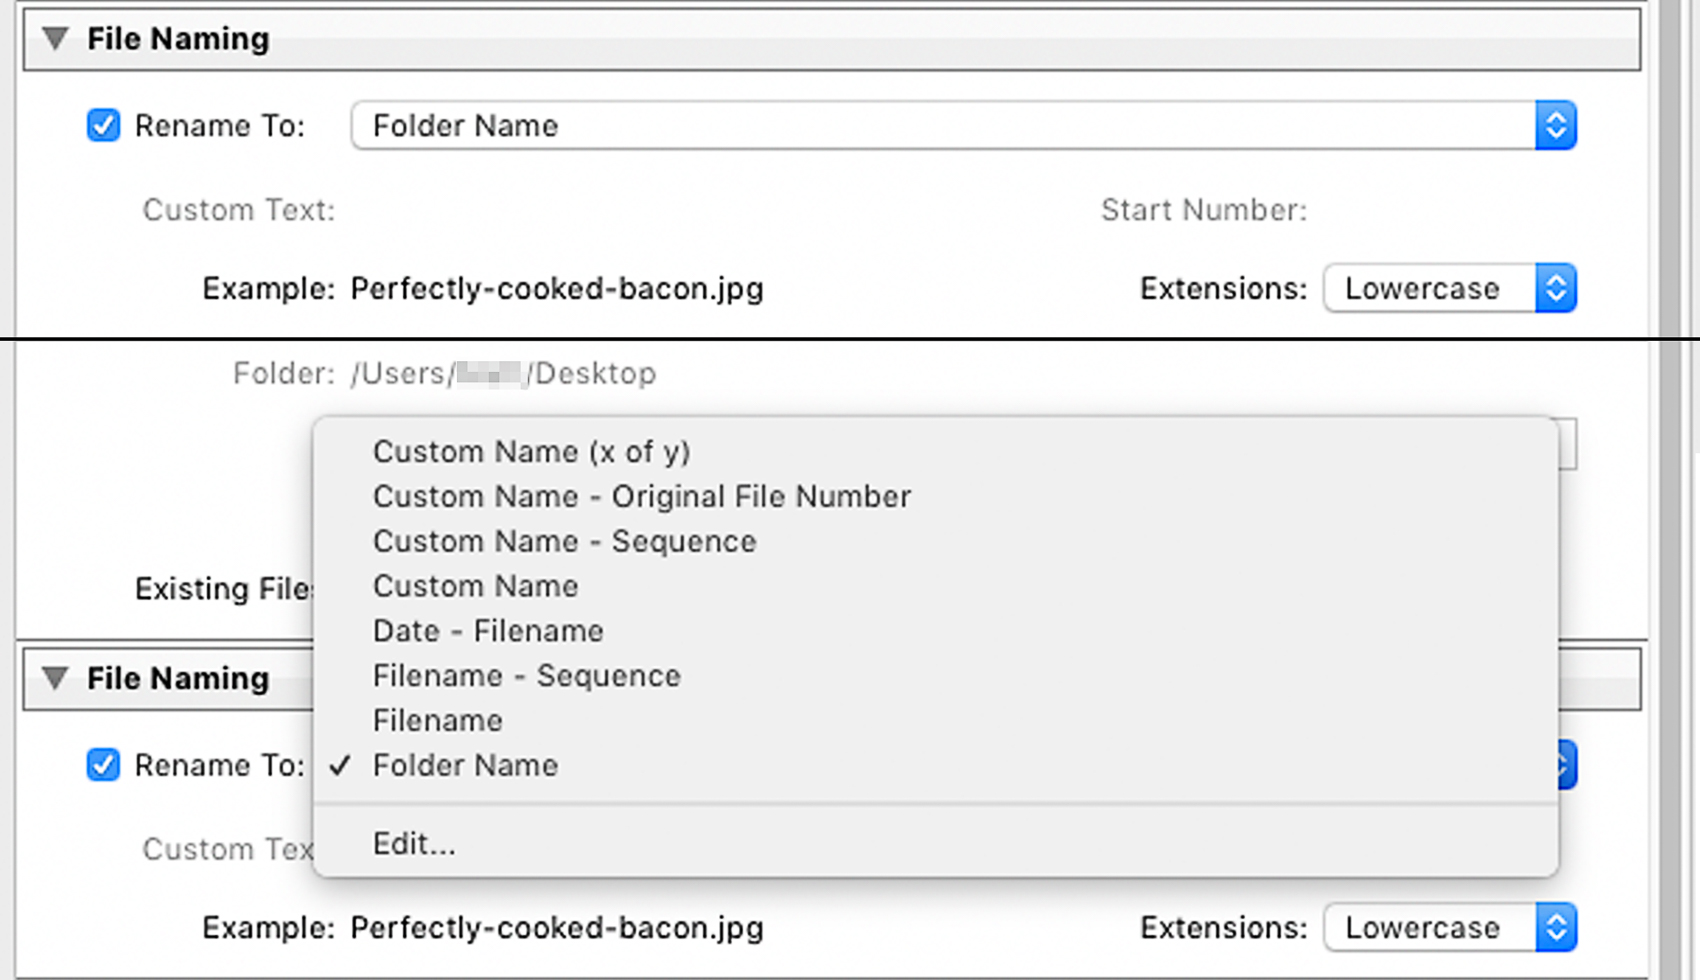
Now here is to set what you want to your filename to be. First you have the option to leave the box unchecked and just let it export with the current filename. In the instance of exporting for Facebook that is fine because Facebook writes it’s own filename and no one will ever see it. However, if you are exporting for your blog, your filename is extremely important to your SEO.
Personally I make the folder my photos are in when I import the same exact thing as my focus keyword. That way, when I export, all I have to do is set it to “Folder Name” and my photos come out with the file name and a sequence. Anyway, let me fill you in on Lightroom’s default settings for this dropdown.
[list][list_item icon=”fa-gear”]Custom Name (x of y): You can enter type in your own file name and Lightroom will then add a set of numbers saying it’s one of a series. For example this would say “Perfectly-cooked-bacon-(1 of 12)”[/list_item][list_item icon=”fa-gear”]Custom Name – Original File Number: This will add the photo’s original file number to the custom name you want.[/list_item][list_item icon=”fa-gear”]Custom Name – Sequence: This will let you set a custom name and a numerical sequence will be assigned to that filename. You can also choose the amount of digits in a sequence, which is super helpful in keeping things in order if you have over 9 images in your sequence. The sequence also depends on what order you have your files sorted in Lightroom.[/list_item][list_item icon=”fa-gear”]Custom Name: You can write in your own name. If you are exporting more than 1 photo Lightroom will assign its own sequence.[/list_item][list_item icon=”fa-gear”]Date – Filename: Lightroom will use the shot date and the the current filename to create a file. If you are exporting more than one at a time, a sequence will be added.[/list_item][list_item icon=”fa-gear”]Filename – Sequence: The original filename will be used and you can set a sequence with the number of digits in that sequence. This is handy in keeping things organized if there are a lot of photos. If you don’t set the number of digits, then your numbering will look like “fiename-1” “filename-10” “filename-100”. All of which will show up in your final list before “filename-2″[/list_item][list_item icon=”fa-gear”]Filename: OK I don’t understand why this one exists because it’s the same as not checking the “rename” box at all.[/list_item][/list]
You can also see that Folder Name is in this list. I created that as my own preset because it works with my workflow. You can do this when you click the “edit” option, which gives you the ability to create your own naming system and preset. Here, let me show you.
Filename Template Editor
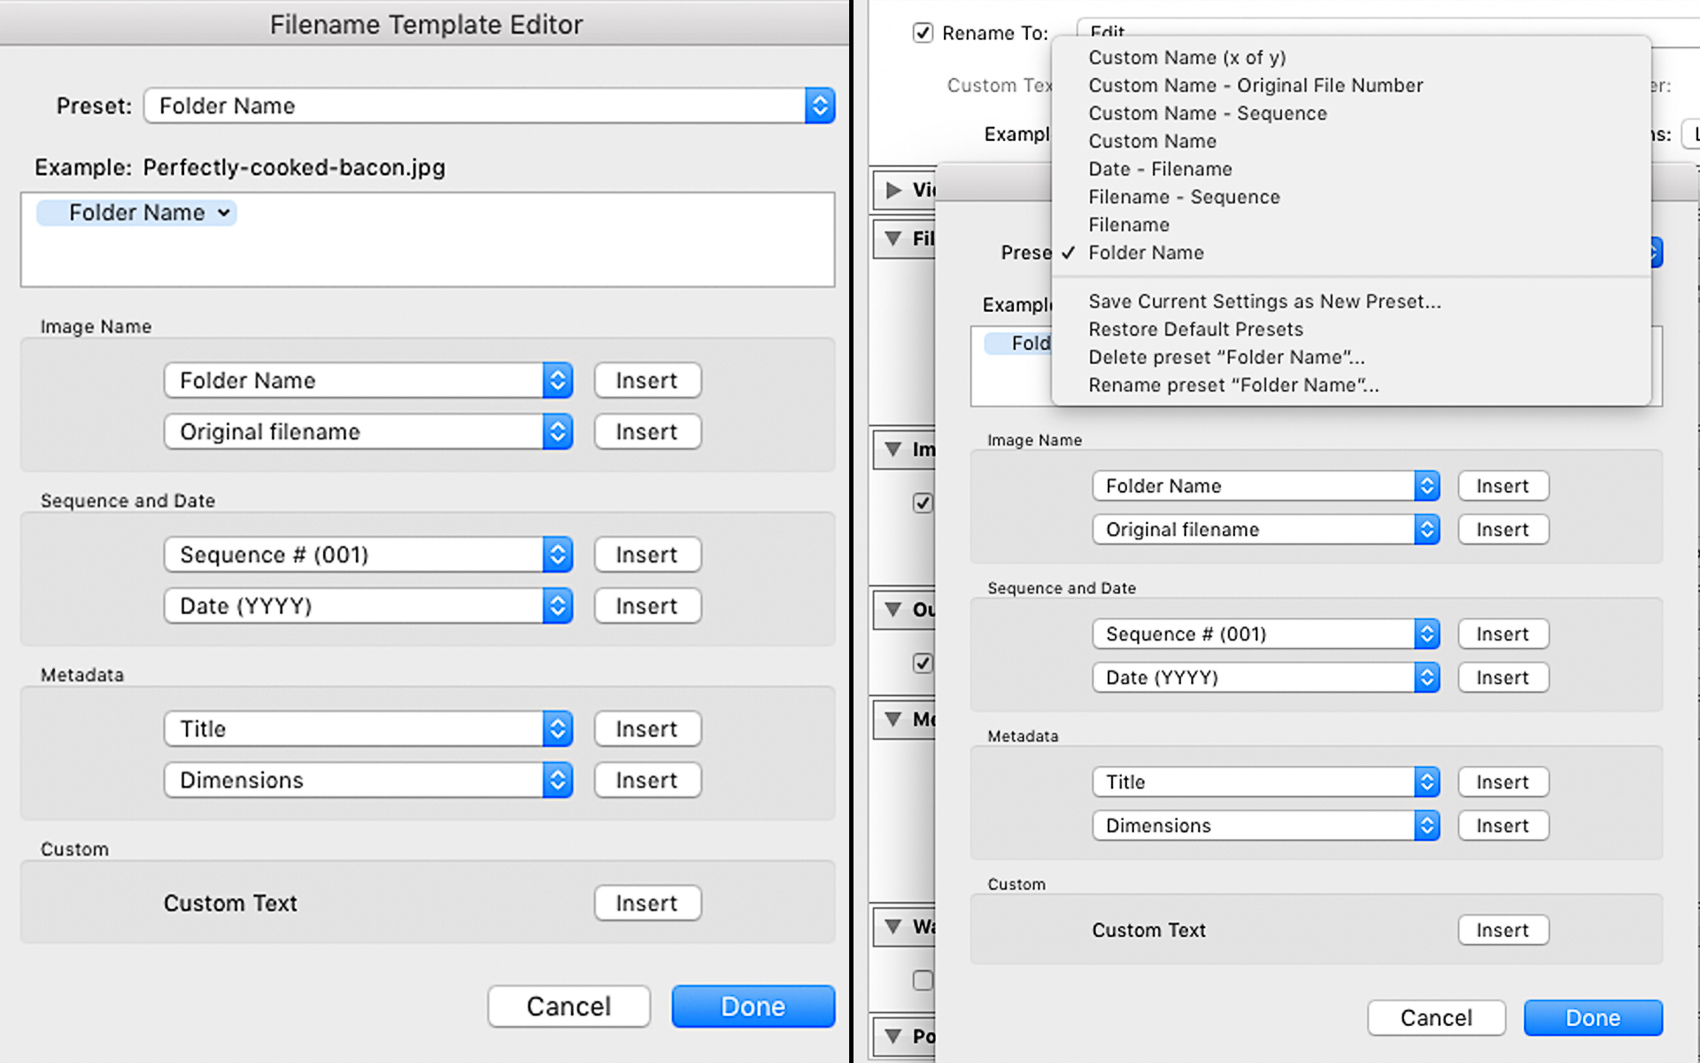
If you click edit, you bring up a whole list of options. At the top is “presets”. This defines what presets will show up in the pulldown menu I showed you before. I made one for Folder Name, just to make things easier on myself, but you can make one as simple or as complex as you want. This is your workflow we’re talking about, not mine. There are so many options in this window that it deserves its own section and I’ll show you what’s what.
All of these choices are basically little modules so you can build them into whatever suits your needs. For example, I could add Folder Name and Sequence # (001) and the resulting exported filename would be “Perfectly-cooked-bacon001.jpg”.

Image Name
In the first drop down we have:
[list][list_item icon=”fa-gear”]Filename: This is exactly what it sounds like. It’s the filename of the image sitting on your computer.[/list_item][list_item icon=”fa-gear”]Filename Number Suffix: This takes your filename and tacks on a number suffix from the metadata. Sometimes this doesn’t exist and it’s honestly not a feature I use. Ever.[/list_item][list_item icon=”fa-gear”]Folder Name: Folder name names the file based on the folder in which the file is in. In my case, my folder is named “Perfectly cooked bacon”. I use this because it keeps me organized and exports to an SEO friendly filename.[/list_item][/list]
In the second drop down:
[list][list_item icon=”fa-gear”]Original Filename: This does pretty much the same thing as Filename. Depending on how you imported your files into your catalog you may see no difference.[/list_item][list_item icon=”fa-gear”]Original Number Suffix: Another feature I never use. Depending on how you imported your files, nothing will happen.[/list_item][list_item icon=”fa-gear”]Copy Name: Again, this is only metadata related and you probably have not filled out that box in your metadata. If you had a client that requested this to be in the metadata then you’d use this but most food bloggers won’t.[/list_item][/list]
Sequence and Date

Difference Between Sequence Number, Image Number, and Total Number
This is where things can get a bit specific. All these options sound the same, but they aren’t. Let me give you the rundown:
[list][list_item icon=”fa-gear”]Sequence #: Will allow you to add a numerical sequence. When this option selected, there will be an input box where you can pick your starting number. 1, 01, 001, 0001 refers to the number of digits that will be in your number.[/list_item][list_item icon=”fa-gear”]Image #: Very similar to sequence number, but you cannot pick your starting number. The number will start at 1, 01, or 001 depending on your sequence.[/list_item][list_item icon=”fa-gear”]Total #: It’s just that. This will display the total number of images selected. Alone, this feature doesn’t do much other than display a number, but it can be a useful tool if you combine it with a sequence or image number box. This is like the x of y feature but you have to do it manually. In this example the file name would look like perfectly-cooked-bacon-001-of-120.jpg (001 being a sequence number and 120 being a total number)[/list_item][/list]

Date and Time
Here you can set your file name based on a ton of time related factors. Here’s the rundown and let’s use the moment this shot was taken as an example. July 31st 2016 at 5:32 and 33 seconds PM:
[list][list_item icon=”fa-gear”]Month, DD, YY: The fact that the month is written out means that the month will be written out in the file name. DD refers two a 2 digit day. YY refers to a 2 digit year.July-31-2016[/list_item][list_item icon=”fa-gear”]YYYYMMDD: Year Year Year Year Month Month Day Day. This is a 4 digit year, 2 digit month, and 2 digit day. Ex: 20160731[/list_item][list_item icon=”fa-gear”]YYMMDD: Year Year Month Month Day Day. This is a 2 digit year, 2 digit month, and 2 digit day. 160731[/list_item][/list]
This is where it becomes highly customizable. You can create your own date format by piecing these together in whatever order you want. This is especially useful if you or your client is not American and uses a different date format if they want to get very specific.
[list][list_item icon=”fa-gear”]YYYY: 4 digit year Ex. 2016[/list_item][list_item icon=”fa-gear”]YY: 2 digit year Ex. 6[/list_item][list_item icon=”fa-gear”]Month: The month written out Ex. July[/list_item][list_item icon=”fa-gear”]Mon: The month written out but shortened Ex. Jul[/list_item][list_item icon=”fa-gear”]MM: 2 digit month Ex. 07[/list_item][list_item icon=”fa-gear”]DD: 2 digit day Ex. 31[/list_item][list_item icon=”fa-gear”]Julian Day of the Year: For whatever reason you need the Julian Day of the Year Ex. 212[/list_item][list_item icon=”fa-gear”]Hour: The hour the image was shot based on a 24 hour clock. Ex 17[/list_item][list_item icon=”fa-gear”]Minute: The minute of the hour the shot was taken Ex. 32[/list_item][list_item icon=”fa-gear”]Second: The second of the minute of the hour this shot was taken Ex. 33[/list_item][/list]
So now that you know the ingredients for a date based file name recipe, you can decipher this filename:
perfectly-cooked-bacon-2016-07-31-17-32-33.jpg (July 31st, 2016 5:32:33 PM)
You rarely need to get this specific, but now you know that you can make your file name the moment the image was shot down to the second. This, actually, can be nice if you shot an event and just wanted to make filename based on time rather than arbitrary numbers. Keep in mind, the time is taken from the camera’s internal clock that you have to set yourself. So, if the clock is off then your shot time will be off.
Metadata
These recipe ingredients are taken from the metadata of your image, some of the which is automatically entered and some of which you need to fill in yourself.

I’m not going to go into detail on that but whatever corresponding information will show up in your file name. The first pulldown covers very specific information, while the second dropdown covers information about the image edits, rating, or camera information.
File Settings

Alright we’re just going to skip video for this tutorial. If you are exporting video, do it in your video editing software because it will just handle it better.
The next block is File Settings. This setting lets you set what format you want your exported photo to be. You can save it as a JPG, PSD, TIFF, DNG, or use whatever the original file format was. Each one has it’s own specific settings:
[list][list_item icon=”fa-gear”]JPEG: This gives you the option to set your exported image quality from a scaled of 0-100. You can tell it to limit the file size to a specific size.[/list_item][list_item icon=”fa-gear”]PSD: You can set the bit depth of the PSD document here. 16 is much more detailed than 8.[/list_item][list_item icon=”fa-gear”]TIFF: You can set the bit depth just like in PSD as well compression[/list_item][list_item icon=”fa-gear”]DNG: You can set the compatibly with past versions of Adobe Camera RAW. Every DNG comes with a JPEG preview in the file, which you can set the quality of here. There 3 other options that I won’t get into here under this menu but if you want to know more please ask in the comments.[/list_item][list_item icon=”fa-gear”]Original:There’s nothing here. It saves as the original file format.[/list_item][/list]
Color Space
I won’t delve into all the details of color management here but I will say that if you are exporting for web or screen applications, use sRGB. Almost all prosumer and consumer level cameras will give you the option to shoot in sRGB or AdobeRGB (1998). You should be shooting in AdobeRGB because it captures more colors for you to work with in post. sRGB is a more limited color space and is designed that way because there are so many monitors and screens out there; some may be highly capable, while some are just super basic in their ability to reproduce colors.
Image Sizing

In the Image Sizing block you can, if you wish to, set the size, resolution, ratio, and dimensions of the image you are exporting. Let’s go over the options:
[list][list_item icon=”fa-gear”]Width and Height: This defines a box for the maximum width and height an image will be. If you are exporting a group of images, whether vertical or horizontal, the width and height will still be same. However, if you have a vertical image and a horizontal image the horizontal will be the SAME width as the vertical.[/list_item][list_item icon=”fa-gear”]Dimension: Similar to Width and height, but it takes into account the orientation of the photo. If you export using this method the horizontal images will have the same length on the long edge.[/list_item][list_item icon=”fa-gear”]Long Edge: You can set the length of only the long edge of the photo. Lightroom will then set the short edge based on the image’s ratio.[/list_item][list_item icon=”fa-gear”]Short Edge: You can set the length of only the short edge of the photo. Lightroom will then set the long edge based on the image’s ratio.[/list_item][list_item icon=”fa-gear”]Megapixels: Here you can set the image size by megapixels[/list_item][list_item icon=”fa-gear”]Percentage: You can export at a specific percentage of the original image.[/list_item][/list]
Output Sharpening

Here you can have Lightroom sharpen your photos depending on the application. Choices are (print) matte paper and glossy paper, and screen. You rarely will need anything other than standard because any heavy duty sharpening should be done in Lightroom or Photoshop.
Metadata

Metadata is the information about you and the image you shot that is embedded in your RAW files. You can set this to keep the original metadata, keep your copyright and contact info only, or remove it completely.
Watermarking

If you have a watermark, this is where you tell Lightroom to put it in and where to put it.
Post Processing

You can set Lightroom to do a specific action after it’s been exported. Two of the default options are showing the file in the finder (on mac) or opening the file in Photoshop.
Now you know how to use the Export settings window in Adobe Lightroom. The question now is, what can’t you do with it? I suppose make toast…
Leave a Reply to Erin @ The Speckled Palate Cancel reply